

Timeline Panel
Cantabile's Timeline Panel provides a detailed view of the contents of audio and MIDI files and can be used to set play ranges and loop modes.
Showing and Hiding the Timeline Panel
To show the onscreen keyboard:
- Choose Timeline from the View menu, or
- Press Ctrl+E.
- Hold the shift key while dragging up from the edge of the main window, or from the top of the on-screen keyboard.
To hide the timeline panel:
- Resize it (by dragging it's top border) until it disappears.
- While the timeline is active, press Shift+Escape.
To leave the timeline visible, but move focus back to main panel press Escape.
Multiple Media Players
The timeline panel shows the contents of the selected file in the most recently activated media player. If you have multiple media players in a song you can select which file is shown in the timeline panel by selecting the associated media player.
Elements
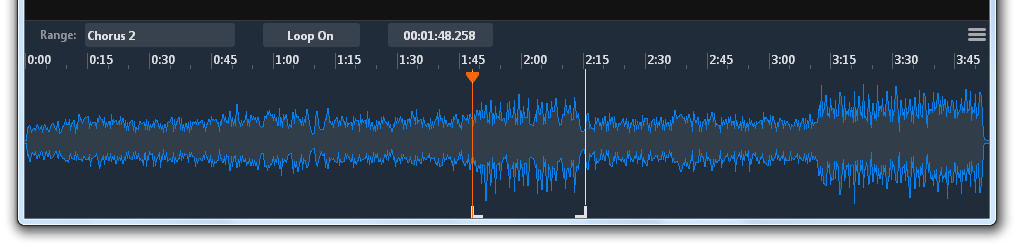
The timeline panel consists of the following elements:
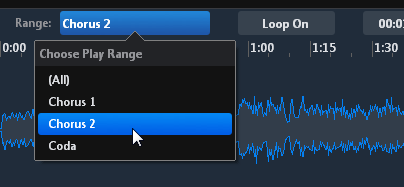
- Range Selector - shown as "Chorus 2" in the above screen shot can be used to switch between different user-defined ranges
- Loop Mode Selector - choose to enable loop mode on the selected range.
- Position Indicator - shows the time position of the selected indicator.
- Menu - three bar menu on the right hand side provides additional commands.
- Time Axis - shows time range of the displayed part of the file.
- Waveform and MIDI Display - a visual representation of the media file.
- Current Position Indicator - vertical orange bar with handle at the top.
- Left/Right Markers - white vertical bars with handles at the bottom.
Setting a Play Range
You can set the play range by either:
- Clicking on the left/right markers handles and dragging
- Playing the media file and pressing the [ or ] keys to set the left or right marker to the current play position
- Moving the current play position while playback is stopped and using the [ or ] keys to set the markers.
- Holding the Alt key and click-dragging a range.
- Selecting one of the left/right markers and using the left/right arrow keys to move it.
Saving and Recalling Named Play Ranges
Sometimes you might like to save a play range for later recall. To create a saved play range:
- Set the range you want to save.
- Press Shift+R, or choose Save Play Range from the Timeline menu.
- Enter a name for the range and press OK.
To recall a previously saved range choose it from the play range drop down. You can open this drop down by clicking on it, or pressing the R key.
Each named play range stores the left and right markers, the view zoom/scroll position and the current loop mode setting.
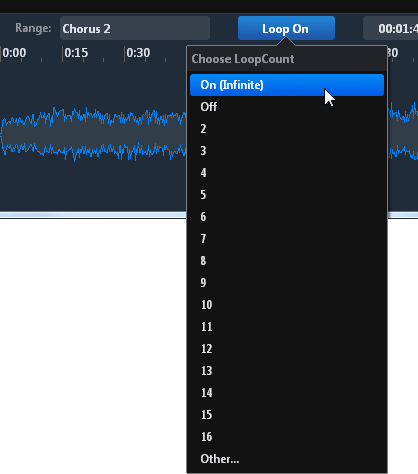
Setting the Loop Mode
By default playback stops when the end of the play range (or the end of the file) is reached. You can loop playback either indefinitely or a preset number of time using the loop menu:
Zooming and Scrolling
The timeline can be zoomed the following ways:
- Using the Ctrl+Left/Right arrow keys
- Using Ctrl + Mouse Wheel
- Pressing A to restore the view to the entire file
- Pressing C to zoom to about 15 seconds around the current play position
- Pressing the Z key while clicking and dragging to zoom to a particular range
To scroll the timeline:
- Use the arrow keys, page up/down keys or home/end keys when the waveform or MIDI data is highlighted.
- Use the mouse wheel (either horizontal or vertical mouse wheel will work)
- Use the scrollbar
Time Format
The displayed position indicator and the timeline axis can be configured to display either musical time (beats and bars/measures) or real-time (minutes and seconds).
To switch format, choose from the timeline panel menu. The selected format is stored with the selected media file so different files can be displayed using different formats.
Normal, Fine and Coarse Cursor Movement
The cursor and left/right markers can be moved in one of three different granularities. Select the associated indicator by clicking its handle and use the following keys:
- Fine - Shift + Arrow Keys
- Normal - Arrow Keys
- Coarse - Page Up/Down Keys
Cursor Snapping
When using the mouse to select or drag positions in the timeline it can be configured to snap to aligned boundaries such as seconds, or beats or measures (depending on the current time format).
Snapping can be enabled and disabled in the timeline menu and the operation can be inverted at any time by holding the Shift key while moving the mouse.
Custom Key Bindings
Many of the shortcut keys for working with the timeline can be customized in Options → Hot Keys.