

Bindings
Cantabile Solo and Cantabile Performer Only
Bindings let you control nearly all settings in Cantabile (and any loaded plugins) from an external MIDI device like a keyboard, control surface or drum pad. Cantabile supports many different MIDI controller events and many different controllable elements within Cantabile.
Cantabile Performer also supports "reverse bindings" where a setting inside Cantabile can be reflected to an external MIDI device so that whenever the setting changes an appropriate MIDI message is sent.
Note: "Bindings" is the new name for what was called "MIDI Assignments" in earlier versions of Cantabile
Bindings Editor
Bindings are edited using the Bindings tab in Cantabile's main window:
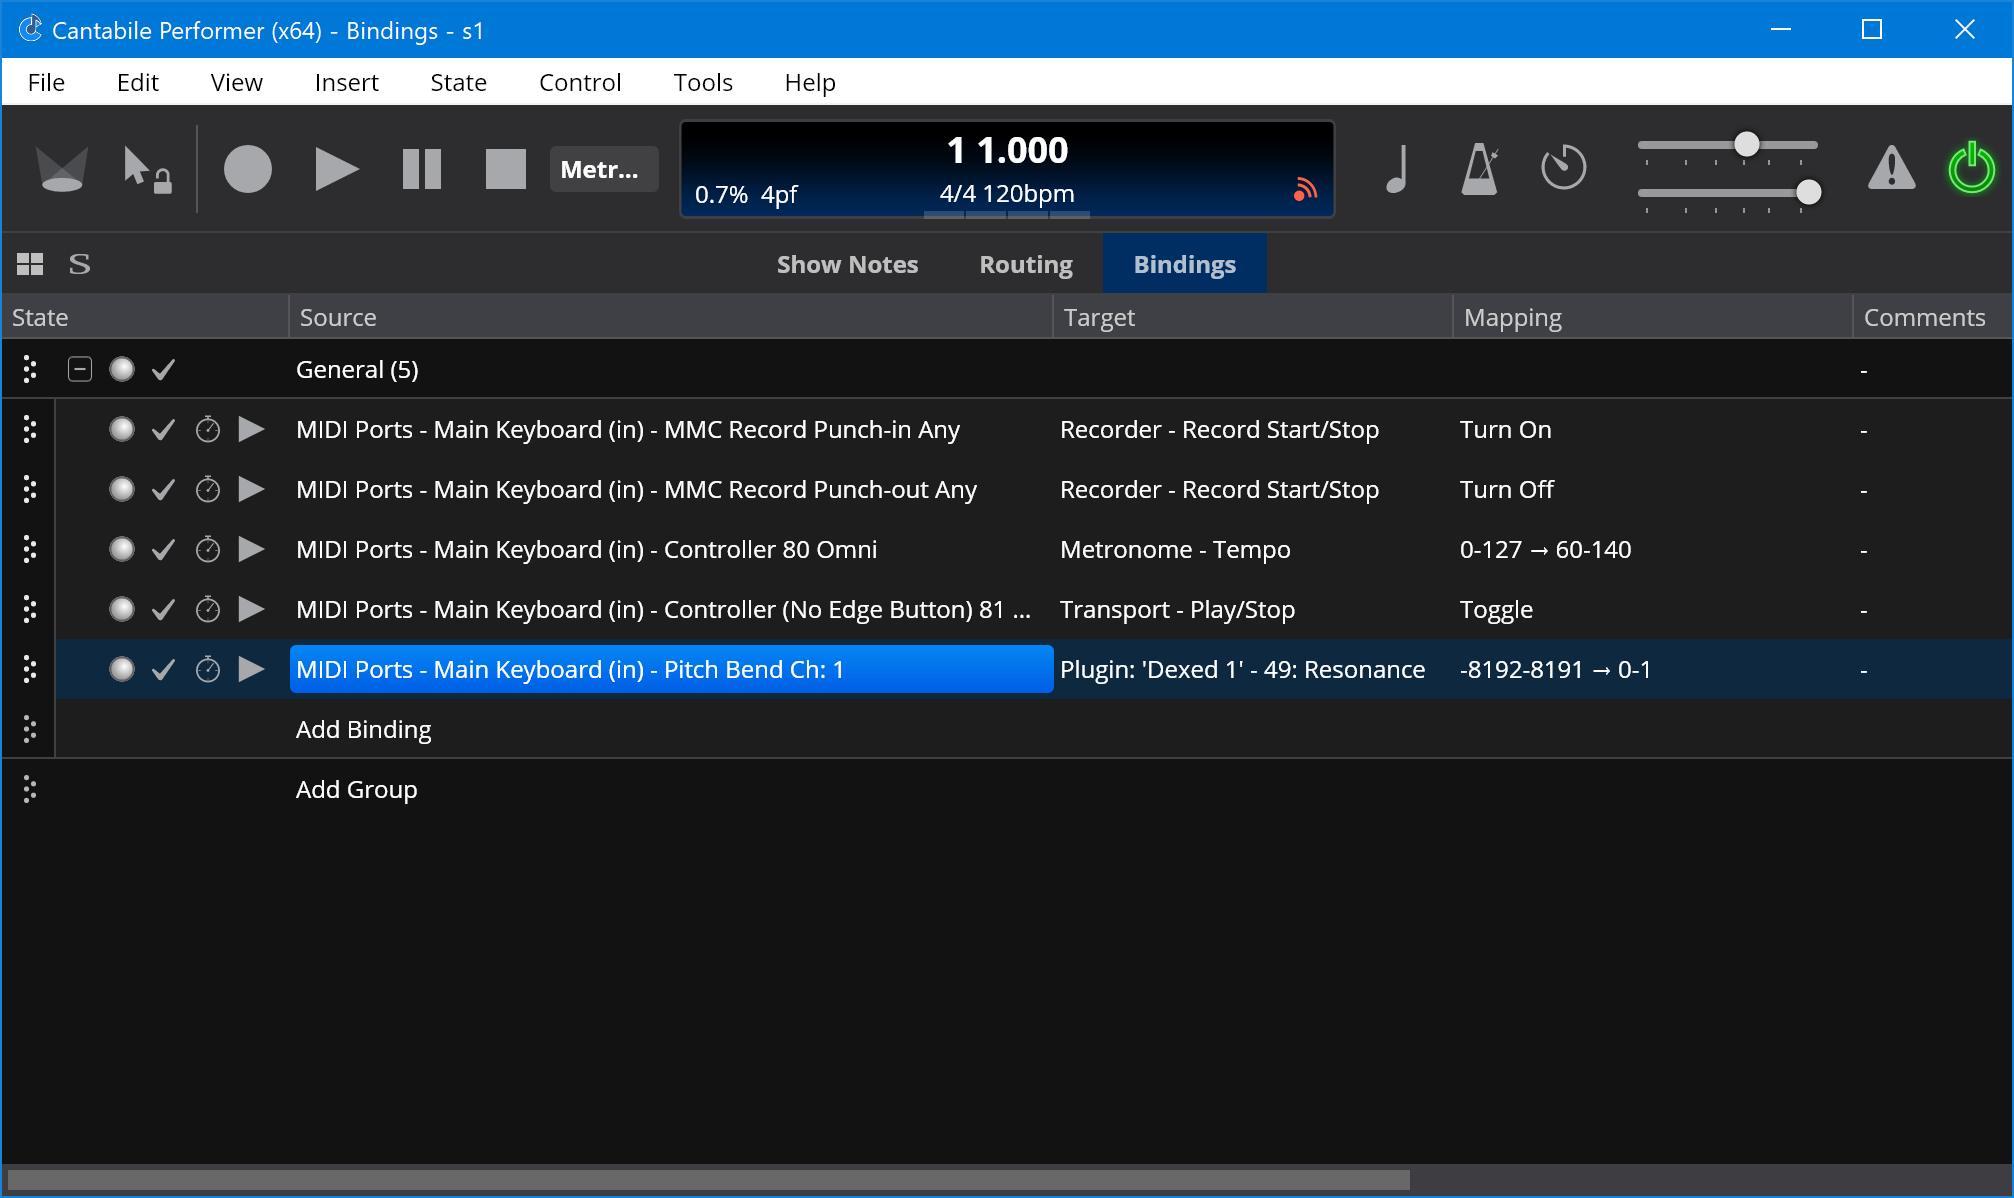
You can switch to this tab either with the mouse, or by pressing Ctrl+D or by using Ctrl+Tab/Ctrl+Shift+Tab.
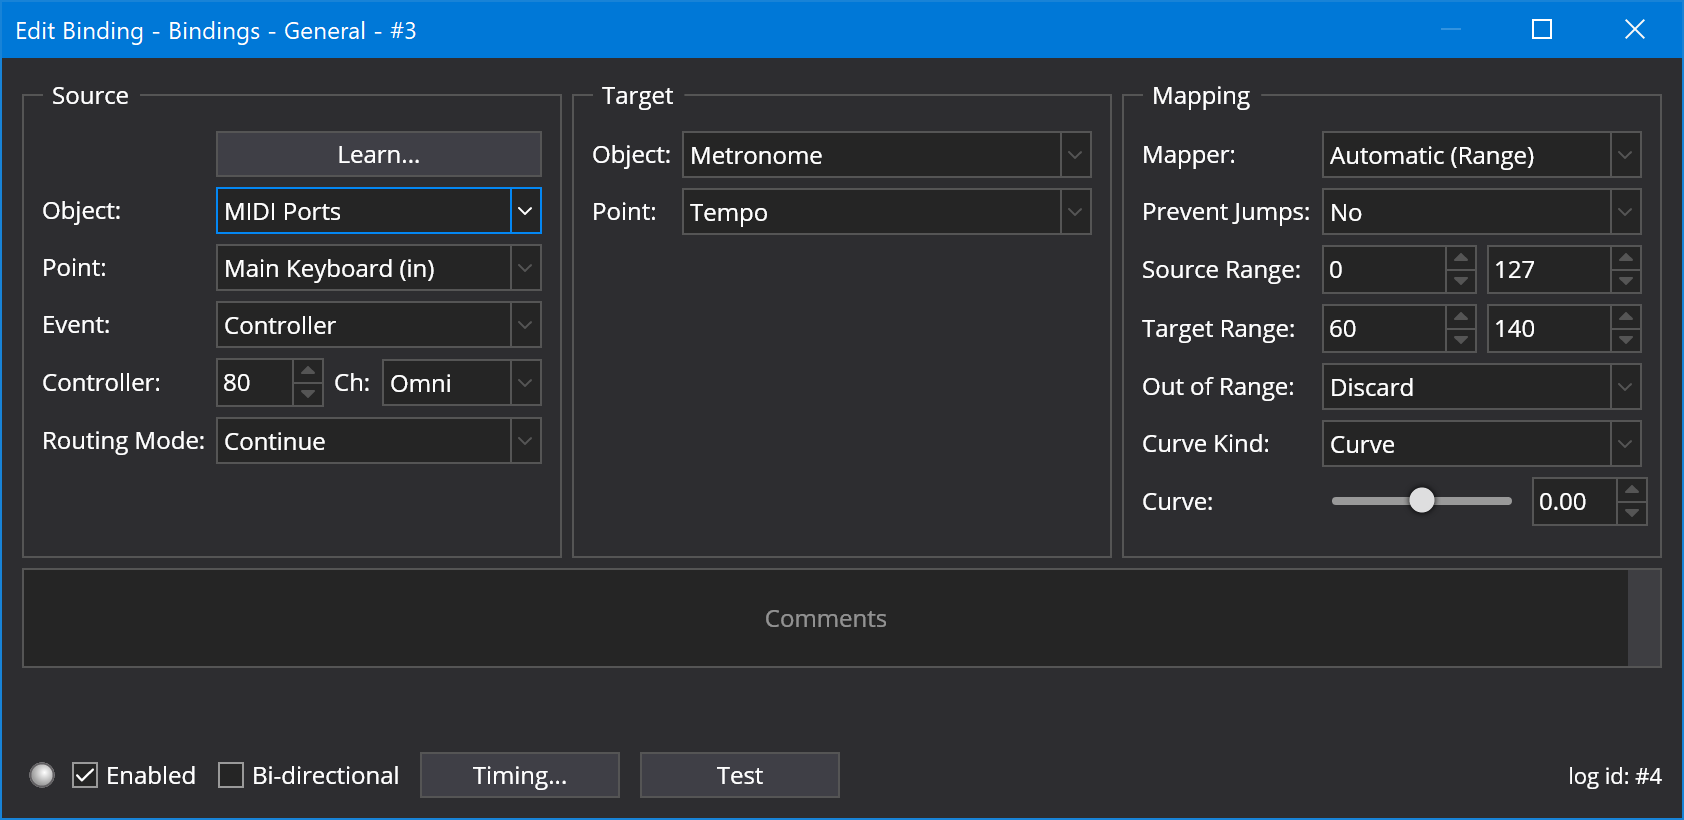
Double clicking on a binding brings up the binding editor panel for that binding:
Learning Binding Source
The easiest way to create a new binding is to let Cantabile "learn" it. Click the "Add Binding" button and choose the "Learn Binding" option.
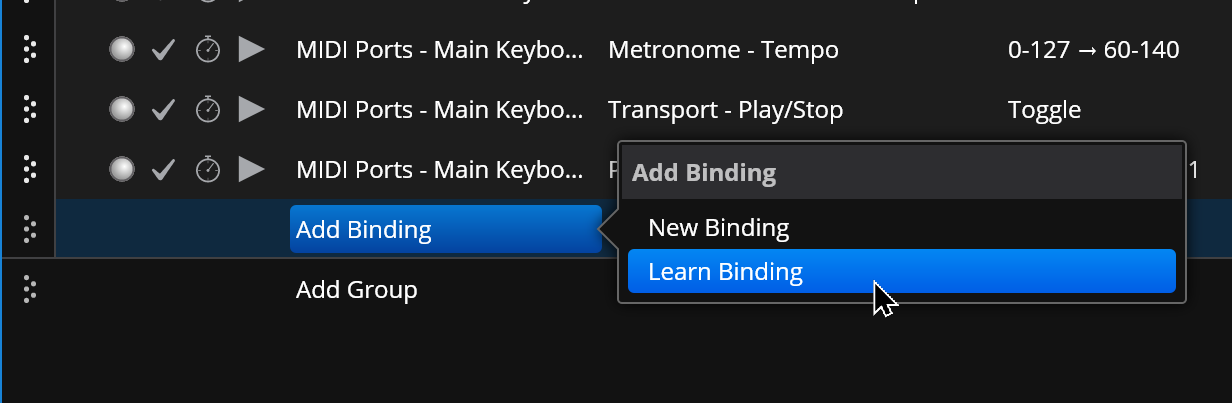
A window will appear that shows all incoming MIDI events. Move or press the controller that you want to bind and it should appear in the list. Double click the event you want to bind and a new binding with that source controller will be created.
You can then use the binding editor to configure the rest of the binding.
Learning Binding Targets
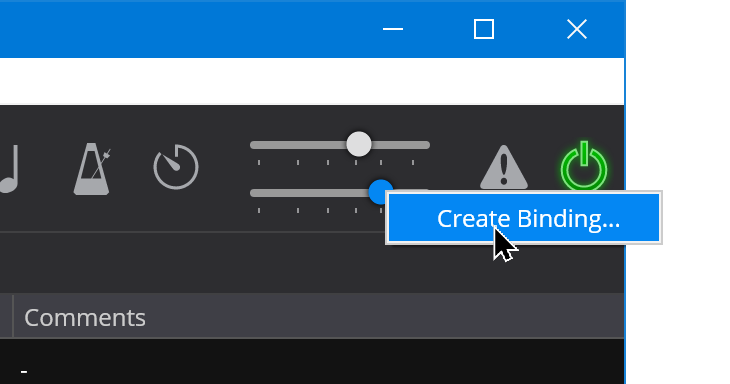
The other way to create a binding is by right clicking on the target setting you want to bind to. For example to create a binding to the master gain setting, right click on it an choose Create Binding:
You'll then be prompted to move the control you want to bind to with the appropriate target binding point selected:
Learning Plugin Parameter Binding Targets
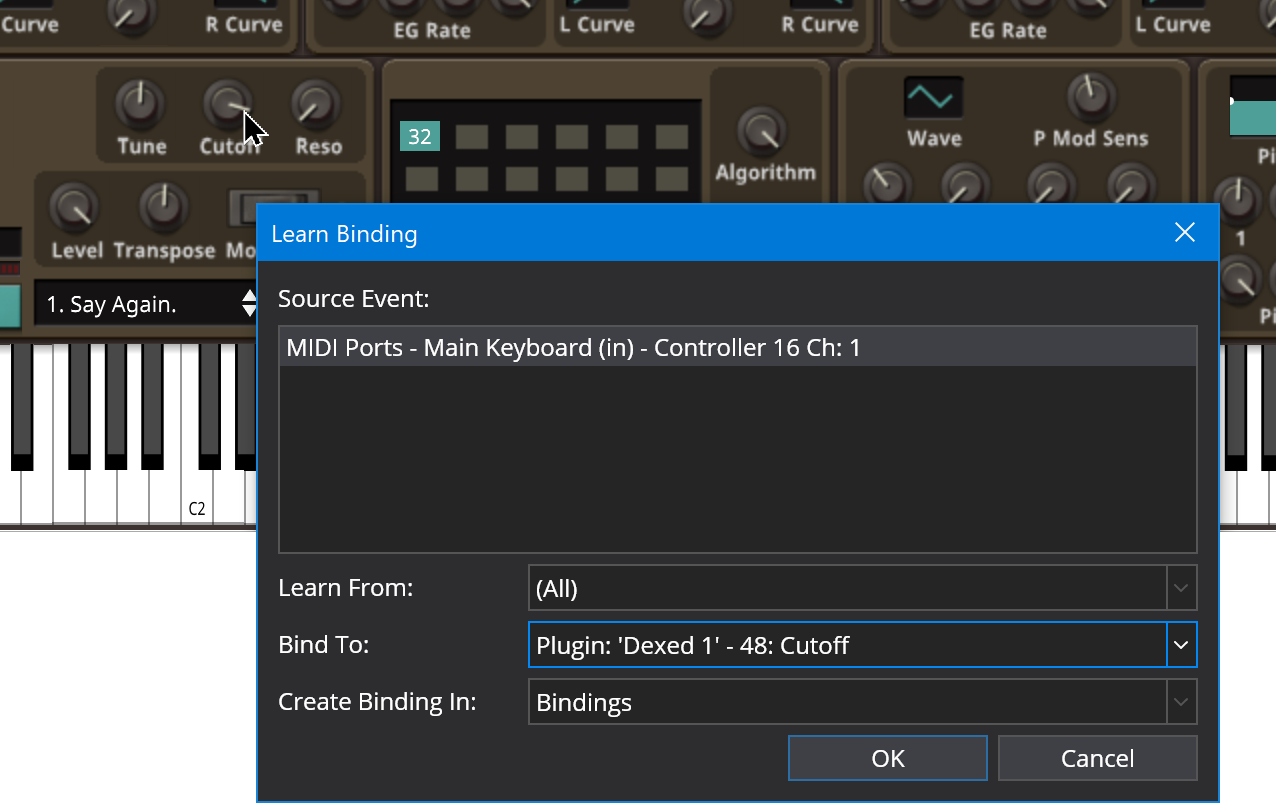
To learn a binding to plugin parameter, open the plugin's editor and choose Create Parameter Binding:
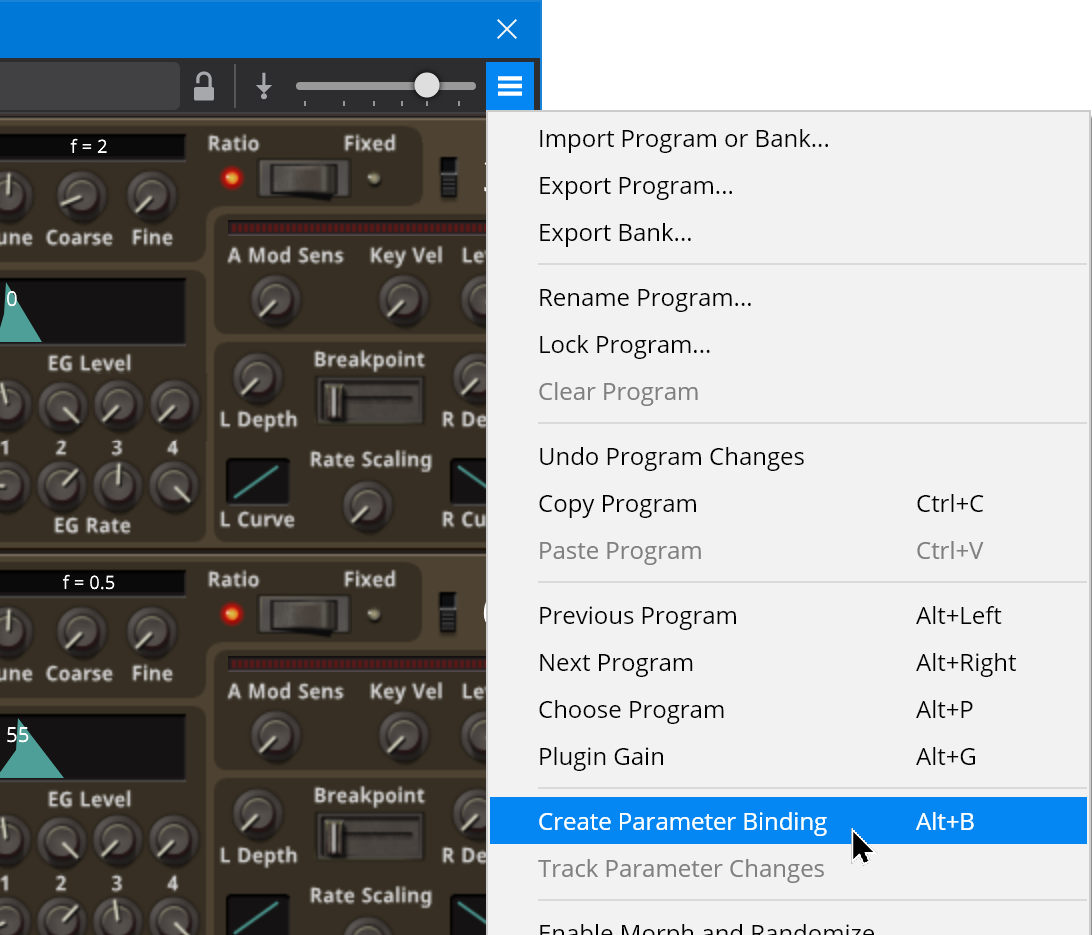
While the Learn Binding window is open you can move any setting in the plugin editor and the associated parameter will be selected in the Bind To drop down. Here the "Cutoff" knob was turned resulting in the "Cutoff" parameter being selected:
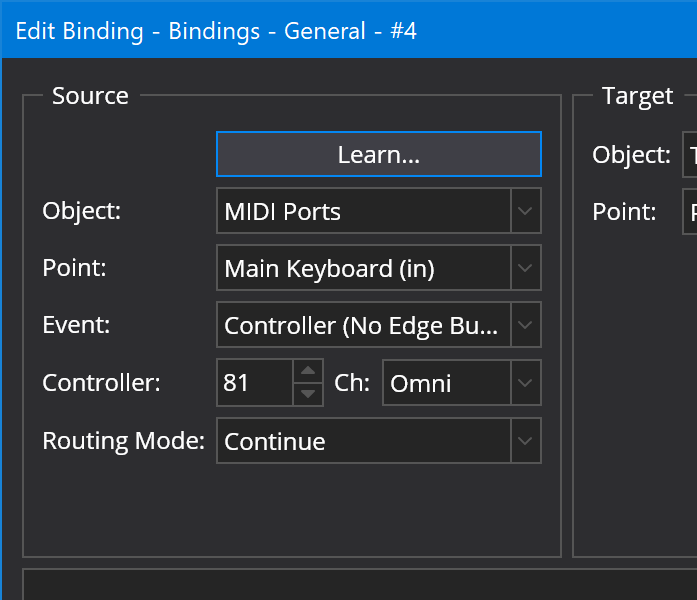
Binding Settings
Each binding has three main groups of settings:
- The Source Binding Point - the setting, event or action that triggers the binding
- The Target Binding Point - the setting or action invoked when the binding is triggered
- The Mapper - how values from the source binding point are mapped to the target binding point
Binding Points
The source and targets or a binding are specified as a "Binding Point" which is specified specified using an "object/point" concept:
- The "object" is top level item that is triggering or receiving the event, eg: "Recorder"
- The "point" is the setting or event on the object that triggers or receives the event, eg: "Auto Record Mode"
Often a binding point will have addition parameters. For example, MIDI binding points have addition parameters that specify the MIDI event, controller, channel that trigger or will be sent by the binding point
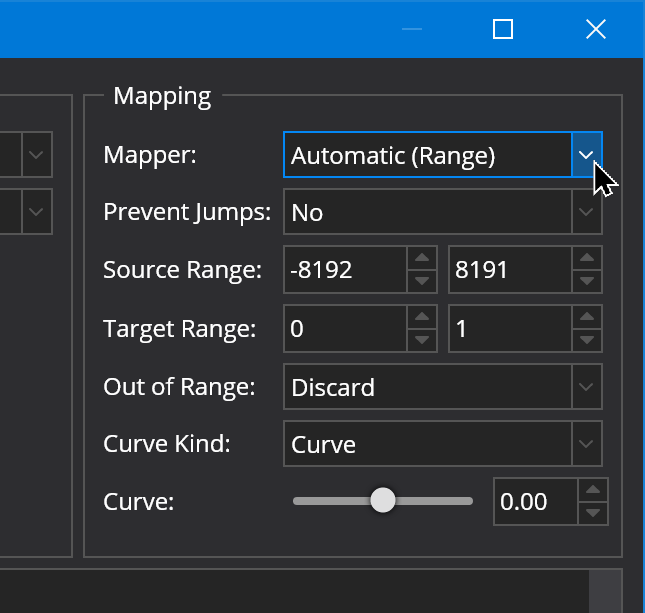
Mapper
Mappers let you control how values are mapped between the source and target values. The set of available mappers changes depending on the selected source and target binding points.
Other Settings
Besides the Source, Target and Mapper bindings also support the following settings:

- Comments
- Type your own notes and comments here
- Activity Indicator
- The LED indicator lights up when the binding is active - ie: when its responding to changes from the source.
- Enabled Checkbox
- Enables or disables the binding
- Timing
- Allows configuring delays and scheduling that control when the target side of the binding should be invoked. (Cantabile Performer v4 only). See below for more information on configuring these options.
- Test
- Manually invokes the target side of the binding (for testing)
Jump Prevention and Rotary Encoder (Relative CC) Support
See Binding Jump Prevention and Relative (Rotary) Encoder Support
MIDI Routing Modes
MIDI Source binding points have a routing mode that determines how processing proceeds after the binding has been matched to an incoming event:
- Continue
- The original event continues to be routed as if the binding didn't exist.
- Suppress
- The original event is suppressed. Subsequent bindings and other MIDI targets won't receive the event. This mode is useful when binding specific notes to action (eg: binding the lowest key on your keyboard to move to the next song)
Delays and Scheduling (Cantabile Performer)
In Cantabile Performer you can configure a delay between when a binding is triggered and when the target side of the binding is actually invoked.

The "before delay" is a delay between the time of the triggering event and the time the target side of the binding is invoked.
The "after delay" is a second delay that will be introduced between the time this binding is invoked and the next delayable binding is invoked. If there are no other delayable bindings after this one then this setting has no effect. (This option is not available if the schedule setting is set to "Nothing")
Bindings can be scheduled in several different groups within which the delay timings are calculated relative to each other.
ie: the pre-delay causes a delay between the last currently pending binding in the group and the post-delay causes a delay between this binding and any other subsequent bindings in the same group. For example, suppose you had two bindings each with a 500ms pre and post delay. If these were configured in the same group and they were triggered at the same time, they would be invoked as follows:
- in 500 milliseconds the first binding would trigger (500ms pre-delay on the first binding)
- in 1500 milliseconds the second binding would trigger (500ms pre-delay on the first binding + 500ms post-delay on the first binding + 500ms pre-delay on the second binding)
A third binding the the same group with a pre-delay of 0 would trigger at 2000 milliseconds (because of the 500ms post-delay on the second binding).
A bindings delay group is set using the "Schedule this binding's delays with" drop down.
- Nothing - only the pre-delay is used and is scheduled from the time the binding is invoked. This is a simple delay unaffected by other bindings.
- Globally scheduled bindings - all bindings in all racks and songs with this group selected will be scheduled relative to each other.
- Other bindings in this song or rack - all bindings in the same rack or song with this group selected will be scheduled relative to each other.
- Other bindings invoked by the same event - all bindings invokes by the same triggering event will be scheduled relative to each other.
The "Pause song and state load operations until complete" option specifies what happens if certain major operations occur (such as song or state switch, engine shutdown etc...) while the binding is in the pre-delay period:
- When enabled, the operation will block until the binding has fired.
- When disabled, the binding will be canceled and wont fire.
For example suppose you have a binding configured to fire 10 seconds after a song loads. Then suppose you load the song and then immediately switch to another song (before the 10 second time out). If the binding is configured as blocking then Cantabile will block the song switch until the 10 second time expires, the binding will then be invoked and then the new song will be invoked. If the binding is configured as non-blocking the delayed action will be canceled and the song switch will happen immediately.
Sys-Ex Bindings
Cantabile Performer Only.
A binding can generate sys-ex data if the target is a MIDI port and the event kind is set to "SyeEx". For details on setting up sys-ex bindings, see the Sys-ex Expression reference.
Global Bindings
Often you will want to configure bindings that work across all songs.
eg: it doesn't make much sense to create a binding in a song to load the next song in a set list since you'd need to create an identical binding in all songs for it work correctly.
For this reason, Cantabile has a "Background Rack" - a special rack that is always running in the background and whose primary purpose is for global bindings.
To create global bindings:
- From the View menu, choose "Background Rack"
- Switch to its Binding tab
- Create bindings as per any other rack
Note that not all binding targets are available from the background rack. eg: you can bind to a specific plugin in a song because that song might not be loaded when the binding is invoked.
Song, Rack and Background Rack Bindings
Each song and rack has it's own set of bindings and bindings are processed in the following order:
- Song bindings
- Bindings in racks loaded into the active song, in the order the racks are in the song
- All other rack’s bindings (except the background rack) but in an undefined order
- The Background rack’s bindings
The most important part of all this is that the Song bindings take precedence over the Background rack bindings.
Let’s say you have a button on an external controller that for all your songs you want it to perform some function. You could create a binding for that action in the background rack.
Now let’s say for that for one particular song you want to change that button to perform some other action. If you create that binding in the song and set its routing mode to suppress — the song’s binding will take precedence over the background rack bindings and effectively override it.
Special MIDI Event Kinds
Most event kinds are self explanatory as they reflect the associated MIDI event. For MIDI Continuous Controller events (CC's) however there are a couple of different ways they can be used - depending mostly on the type of physical control they're originating from:
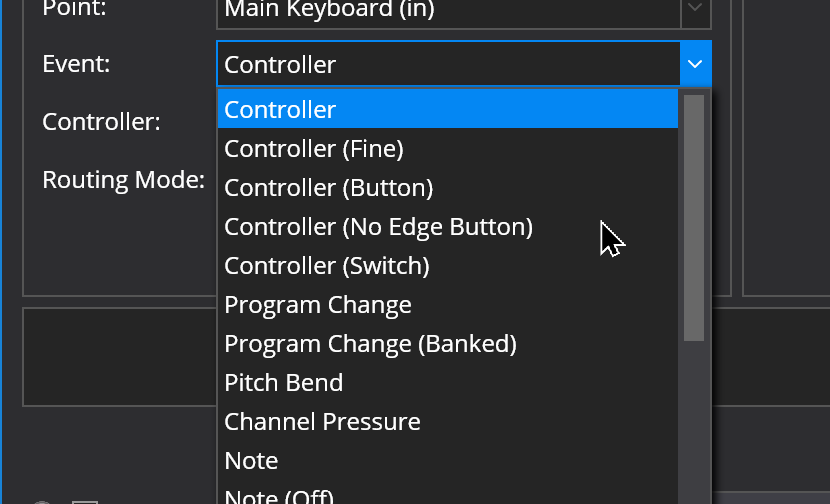
- Controller
- This is a normal MIDI CC event that can be assigned to a variable value (eg: a gain level)
- Controller (Fine)
- These bindings combine MIDI CC 0-31 with 32-63 to create a more precise 14 bit controller.
- Controller (Button)
- A momentary MIDI button that sends a value > 64 when pressed and < 64 when released. This kind of binding is edge-triggered in that it invokes the target when the value crosses from less that 64 to greater than 64.
- Controller (No Edge Button)
- Use this for MIDI buttons that send a non-zero value when pressed and no event or a CC value of 0 when released. ie: it triggers on any non-zero value.
- Controller (Switch)
- This is for non-momentary on/off MIDI buttons and switches that send a value >=64 when on and <64 when off.
Bindings to Routes
Unlike most other objects, routes do not automatically appear as assignable objects in the Bindings editor. This is because by default routes don't have a name and therefore can't be referenced.
To create an binding to an audio or MIDI route:
- Select the route in Cantabile's main window
- From the Edit menu choose "Rename", or press F2
- Type a unique name for the route and press OK
- Though the name won't show in the main window, the new name will appear in the Bindings
- From the bindings editor you'll now be able to create bindings for the route
All routes support binding to the enabled/disabled setting. Audio routes also support bindings to the route's audio gain level.
Bi-Directional Bindings
Cantabile Performer supports bi-directional bindings that establish a two way binding between the binding's source and target. Bi-directional bindings are generally used when binding from a motorized MIDI controller, or from a MIDI controller (knob) with an LED ring to provide feedback to the controller on the current state of the controller.
Bi-directional bindings have certain limitations, including:
- The source must be a MIDI source (ie: a MIDI input port)
- The source and target objects must have the same (or similar, see below) name
- The target must not be a MIDI target
- Not all MIDI event types are supported. Specifically, events that trigger an action (eg: Controller - Button) are not supported.
- The source side of the binding must have a specific channel selected (ie: Omni channel bindings aren't supported)
If the binding is configured as bi-directional, but the reverse binding can't be created due to one of the above reasons, an error message explaining the reason will be displayed when attempting to enable the bi-directional mode. The reason will also be displayed in the tooltip of the bi-directional binding button.
To enable bi-directional mode on a binding enable the "Bi-directional" checkbox in the binding editor:

Bi-directional bindings are typically used is as follows:
- Go to Options → MIDI Ports
- Make sure there is both a MIDI Input and MIDI Output port for the target device with the same (or similar, see below) names
- Create a binding from the MIDI Input device's CC number to the target value to be controlled
- Set the bi-directional mode - half for motorized faders, or full for LED rings
Bi-Directional Binding Mdoes
Bi-directional MIDI bindings can be configured as either "half" or "full" bi-directional using the setting in the source column:
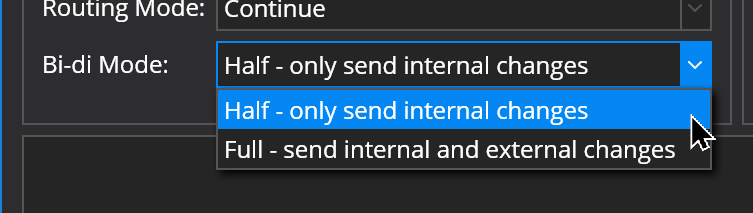
- Half Mode - the reverse binding is suppressed when the forward binding is changing the target value. This can be used with motorized faders if the fader jitters or doesn't move smoothly due to feedback from the reverse binding.
- Full Mode - the reverse binding is always active and is typically used with LED rings.
Bi-Directional Bindings and Similar Object Names
As mentioned above, the source and target objects of a bindings must be "similar" for bi-directional bindings to work. To find a similarly named object Cantabile uses the source object name with the following whole word, case sensitive replacements:
- "in" → "out"
- "In" → "Out"
- "IN" → "OUT"
- "input" → "output"
- "Input" → "Output"
- "INPUT" → "OUTPUT"
This allows for bi-diriectional bindings between port names like "Rack MIDI In" and "Rack MIDI Out"